Building and debugging Java native images of MicroDoc GraalVM Embedded
We illustrate how to build and debug the native image of a Java application, produced by MicroDoc GraalVM Embedded, and running on a remote embedded device. The debugging experience is illustrated inside the VSCode IDE. The embedded device runs Linux on an ARMv8-A processor (running in AArch64 mode), like a RaspberryPi 4 or 5.
Building and debugging Java native images of MicroDoc GraalVM Embedded
MicroDoc specializes in the individual development of embedded software solutions using Java and GraalVM technology. From Munich, Berlin and Stuttgart, our teams of experts serve our customers from the following business areas: automotive industry, mechanical engineering, energy supply and telecommunications.
The GraalVM is the new technology in terms of platform-independent programming. Not only in terms of performance, but also through the support of other languages such as Python and JavaScript, you have all the possibilities of modern software development in the embedded area at your disposal.
An important point in the development of software is always the possibility of debugging your own application. This becomes even more relevant as applications and systems become more complex. Simple and clear debugging directly on the embedded system also reduces the risk of failures and associated costs in production.
This article illustrates how to build and debug the native image of a “HelloWorld” Java application, produced by MicroDoc GraalVM Embedded, and running on a remote embedded device.
The local computer, used for building and debugging the native image, is a Debian Linux/AMD64 system. The debugging experience is illustrated inside the VSCode Integrated Development Environments (IDE). The embedded device runs Linux on an ARMv8-A processor (running in AArch64 mode), like a RaspberryPi 4 or 5.

⏩ TL;DR (too long; didn’t read)
- Build a native image with debug information for a device’s platform.
- Copy it to the device.
- Run it in the device under a debugger agent, e.g.,
gdbserver,lldb-server. - Configure your IDE to connect to a remote debugger.
- Create break points and debug your native image.
🧭 Before you start
Throughout this article, we assume that the reader has access to:
- MicroDoc GraalVM Embedded.
- A Java application in compiled form, e.g., in a JAR.
- A native debugger that supports the device’s platform.
- A native debugger agent that can run on the device.
- An IDE, e.g., VSCode.
We also assume that the reader knows how to:
- Copy files to the devices.
- Run programs on the device.
- Use and configure and IDE that supports remote native debugging.
🏗️ Build a native image on the build computer
Starting with the Java source file <somewhere>/src/com/example/HelloWorld.java, whose contents are:
package com.example;

public class HelloWorld {
    public static void main(String[] args) {
        System.out.println("Hello, World!");
    }
}
First, we need to compile .java source files into .class files, and maybe store them into
a .jar file.
For this, we usually invoke the Java compiler javac, either manually, or through the IDE.
If javac is invoked manually, then make sure to specify -g, in order to store debugging
information into the .class files, thus enabling better debugging experience later on.
$ javac -g -d '<somewhere>/bin' '<somewhere>/src/com/example/HelloWorld.java'
This should generate the file <somewhere>/bin/com/example/HelloWorld.class.
Once the Java sources are compiled, we will build a native image executable using native-image:
$ <somewhere>/graalvm/bin/native-image \
    -O0 -g -cp <somewhere>/bin -o <somewhere>/hello-world --target=linux-aarch64 \
    --native-compiler-path=<somewhere>/aarch64-none-linux-gnu-gcc \
    --native-linker-options=-L<somewhere>/lib \
    -H:+UnlockExperimentalVMOptions \
    -H:+UseCAPCache -H:CAPCacheDir=<somewhere>/cap-cache/aarch64-linux-gnu \
    -H:-StripDebugInfo -H:DebugInfoSourceSearchPath=<somewhere>/src \
    -H:-UnlockExperimentalVMOptions \
    com.example.HelloWorld
This builds the executable <somewhere>/hello-world that runs on the target device, with
debugging information embedded into the executable.
It also populates the source cache directory <somewhere>/sources containing copies of many
sources files that make up the Java application,
e.g., <somewhere>/sources/com/example/HelloWorld.java.
💡 In order to get some information about the executable, you can run:
$ file <somewhere>/hello-world
<somewhere>/hello: ELF 64-bit LSB executable, ARM aarch64, version 1 (SYSV), dynamically linked, interpreter /lib/ld-linux-aarch64.so.1, for GNU/Linux 3.7.0, with debug_info, not stripped
In order to indicate to native-image where the Java source files reside, you can specify the
-H:DebugInfoSourceSearchPath=<some-directory> option, as many times as needed.
⚠️ When building release native images of your application, consider enabling optimizations (
-O2option) and stripping debugging information (-H:+StripDebugInfooption).
📂 Copy files to the target device
You should have the following files on the build computer:
hello-world: the native image file generated for your Java application. This file runs on the device’s platform.sources: a source cache directory containing copies of many sources files (e.g.,.javafiles) that make up the Java application.
You should also have a native debugger agent installed on the target device, e.g.,
lldb-server or gdbserver. We recommend using lldb-server.
💡 To check for
lldb-server, runlldb-server versionon the device.
💡 To check for
gdbserver, rungdbserver --versionon the device:
Every time you build your native image, you have to copy the new binary to the target device. This ensures the program running on the device and the program shown in the IDE debugging session is the same.
Copying files can be done either automatically by your debugger or manually through other means,
e.g., scp, ftp, rsync.
Some IDEs also allow specifying tasks that copy files to remote devices.
For example:
$ scp <somewhere>/hello-world username@somedevice:/tmp/hello-world
💡 Using the
lldbdebugger and thelldb-serverdebugger agent does this automatically.
📡 Run the debugger agent on the target device
In order to debug the native image on the target device, we need to run it, on the device, under the control of a debugger agent.
We will connect through TCP/IP to the debugger agent. For that, we need to choose a TCP port number for the debugger agent to listen to. Any number between 1024 and 65535 should work fine. We chose 11000.
Using the lldb-server debugger agent
We recommend using the lldb-server debugger agent.
If your target device runs Debian Linux or a derivative distribution, then you can install
lldb-server with the following command:
$ apt install lldb
In order to start the lldb-server debugger agent, run the following on the device:
$ cd <some-writable-directory>
$ lldb-server platform --server --listen '*:11000'
lldb-server automatically copies the native image to its working directory before starting
the debugging session.
💡
lldb-serverneeds to be started only once. It can be used to start multiple successive debugging sessions.
Using the gdbserver debugger agent
If your target device runs Debian Linux or a derivative distribution, then you can install
gdbserver with the following command:
$ apt install gdbserver
In order to start the gdbserver debugger agent, run the following on the device:
$ gdbserver --multi --disable-randomization '0.0.0.0:11000'
💡 With the
--multiflag,gdbserverneeds to be started only once. It can be used to start multiple successive debugging sessions.
🪲 Connect the IDE to the remote debugger agent
In order to start debugging in the IDE, the IDE needs to configure a local debugger, in order for it to connect to the remote debugger agent.
We’ll need to figure out the host name or address of the target device on the IP network. If the target device host name cannot be resolved by DNS, then you’ll need to use its IP address instead of its name in the following sections.
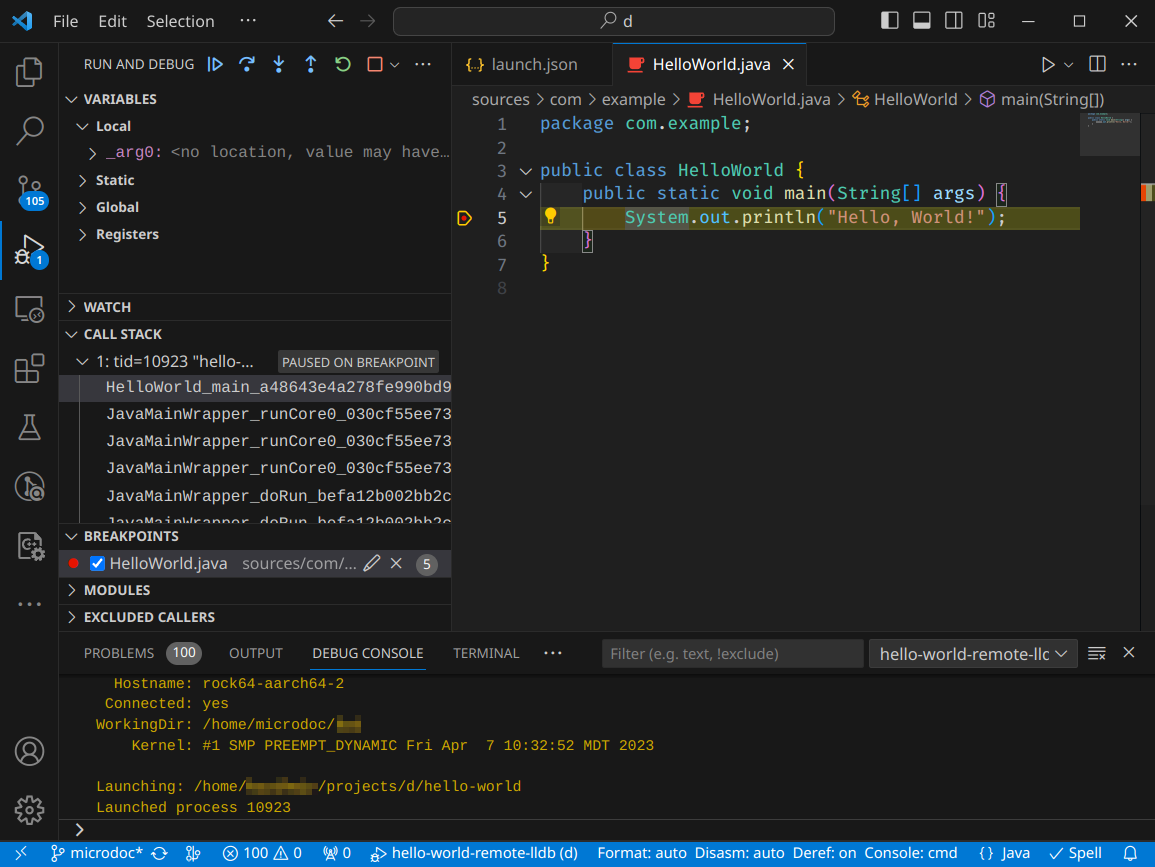
Using the VSCode with lldb-server
Install the CodeLLDB extension. Then, from the menu Run, choose Add configuration. Configure your new debug configuration like the following:
{
    "name": "hello-world-remote",
    "type": "lldb",
    "request": "launch",
    "program": "<somewhere>/hello-world",
    "sourceLanguages": [
        "C",
    ],
    "initCommands": [
        "platform select remote-linux",
        "platform connect connect://<target-device-host-name>:11000",
        "settings set target.inherit-env false",
        "settings set target.language c",
    ],
},
Once done, open a source file in the sources cache directory and put a break point in some method.
Then switch to the Run and Debug pane, select the configuration hello-world-remote,
then click on the play button ▶️.
The CodeLLDB manual is a very helpful resource to tweak the debug configuration.
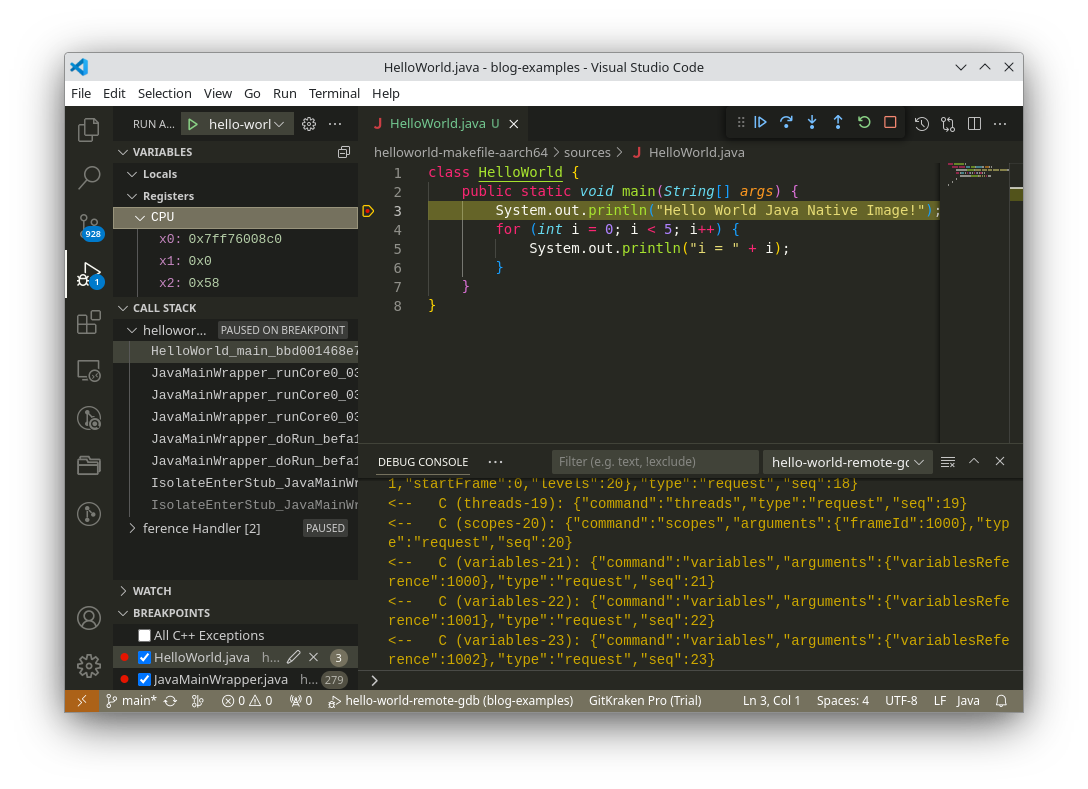
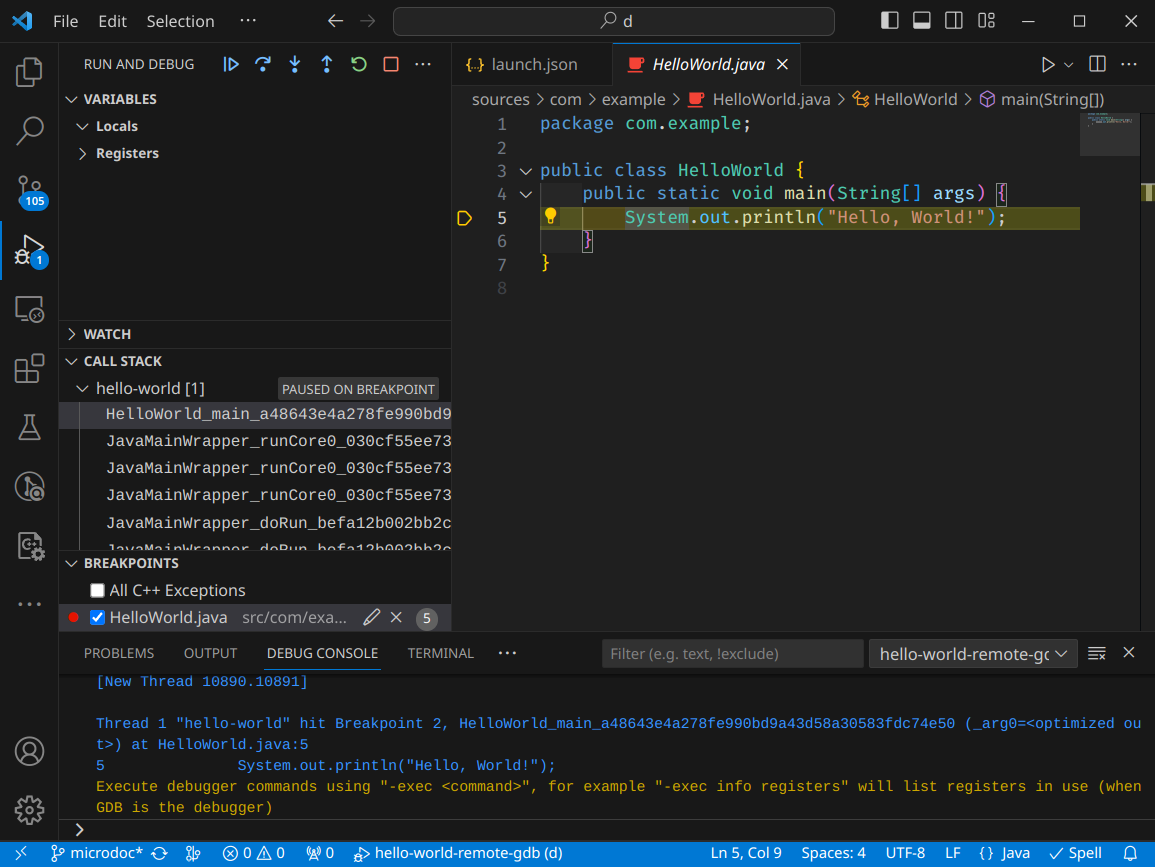
Using the VSCode with gdbserver
Install the C/C++ extension. Then, from the menu Run, choose Add configuration. Configure your new debug configuration like the following:
{
    "name": "hello-world-remote",
    "type": "cppdbg",
    "request": "launch",
    "targetArchitecture": "arm64",
    "MIMode": "gdb",
    "miDebuggerPath": "<somewhere>/aarch64-none-linux-gnu-gdb",
    "miDebuggerServerAddress": "<target-device-host-name>:11000",
    "useExtendedRemote": true,
    "program": "<somewhere>/hello-world",
    "cwd": "/tmp",
    "externalConsole": false,
    "setupCommands": [
        {
            "description": "Set remote executable path",
            "text": "set remote exec-file /tmp/hello-world",
        }
    ],
    "deploySteps": [
        {
            "type": "scp",
            "host": "<target-device-host-name>",
            "files": "<somewhere>/hello-world",
            "targetDir": "/tmp",
        }
    ],
}
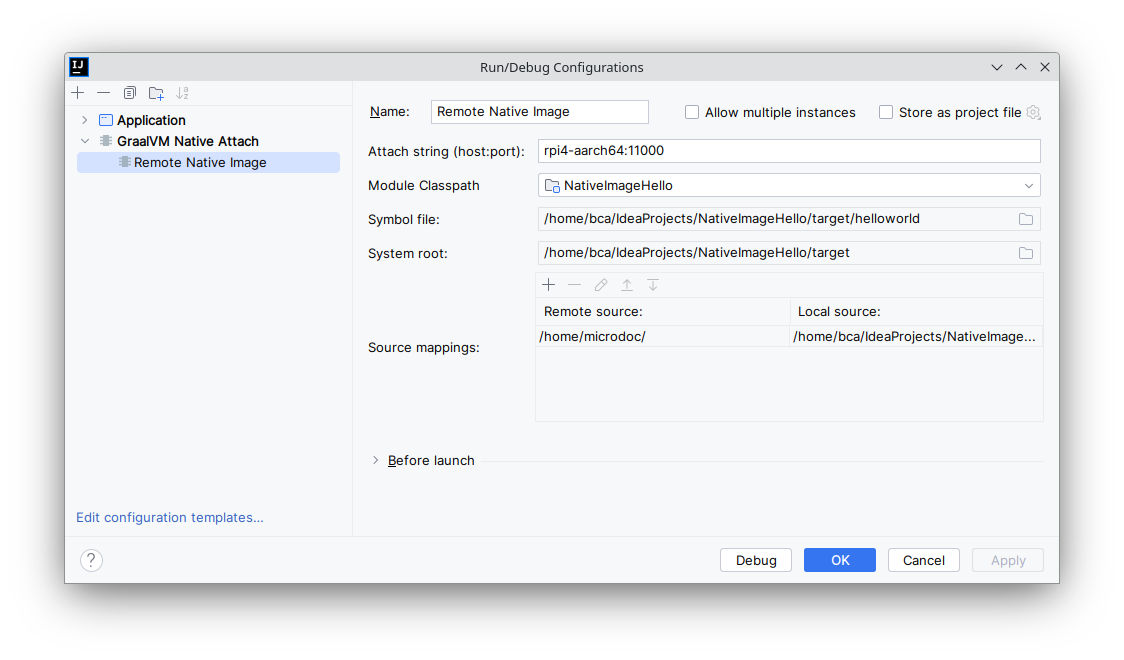
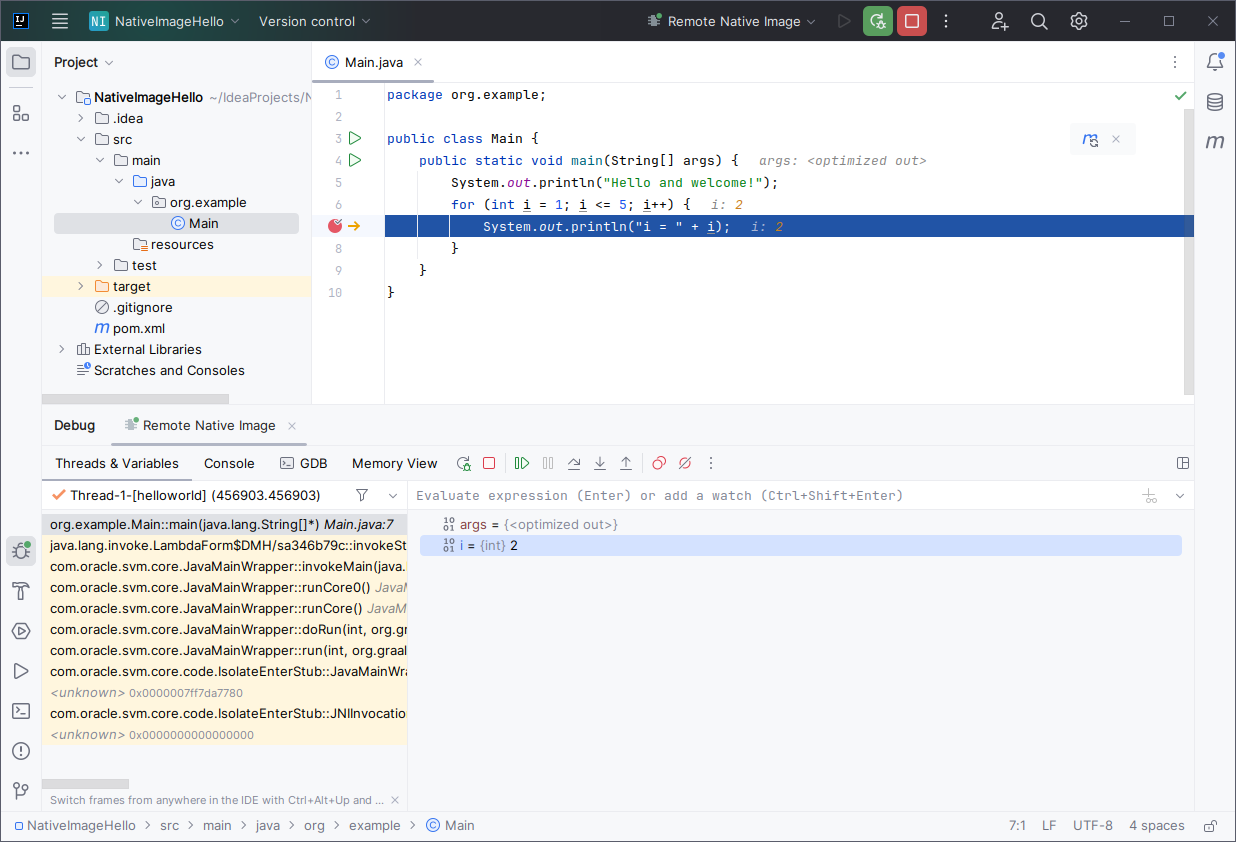
Using the IntelliJ IDEA with gdbserver
Install the GraalVM Native Debugger Plugin. This plugin is only supported by the Ultimate Version.
Then, from the menu Run, choose Edit configurations. Add a new GraalVM Native Attach configuration like the following:
🏁 Still a work in progress
Building native images of Java applications and support for debugging them in an IDE is still an ongoing effort. New features are frequently added, in order to improve the developer experience.
Approaches to reduce the builds times of native images are being investigated, in order to reduce the time of the cycle of writing/building/testing.
Because native images are native programs that don’t need interpretation or just-in-time compilation, they are debugged using native debuggers (e.g., LLDB, GDB), instead of the usual Java debuggers (front-ends of JDWP). This implies that, for the moment, the debugging experience of native images lacks some features that a typical Java debugger provides, such as modifying contents of variables and fields, running Java methods, etc. These limitations are known issues that would hopefully be fixed in the near future, in order to make it easier for Java developers to debug native images in a more familiar setting.
Authors
- Bruno Caballero
- Dr. Christian Kuka
- Dr. Koutheir Attouchi
Stay Connected
Everything On Graal VM
We illustrate how to build and debug the native image of a Java application, produced by MicroDoc GraalVM Embedded, and running on a remote embedded device. The debugging experience is illustrated inside the VSCode IDE. The embedded device runs Linux on an ARMv8-A processor (running in AArch64 mode), like a RaspberryPi 4 or 5.

For devices that are not powerful enough to run a full feature browser or Android system, MicroDoc is developing a user interface framework directly integrated with the Graal virtual machine. Why? Because the number of small devices is increasing dramatically, and although they may be small and low powered they still deserve an up-to-date user interface.
Would it be fair to say that the GraalVM is a step closer to the holy grail of polyglot programming? Yes, according to the virtual machine experts from MicroDoc. Here’s an overview of what the GraalVM can do for software developers.